Butterfly Photography
... The hunt for flying flowers!
Mastering butterfly photography isn't so difficult...

A few tips and some practice time could net you some totally awesome images!
Give it a few minutes to read this page since
photographing butterflies does require a few extra special skills and
preparation. They're zippy and they don't stay still for long.
The Boy Scouts said it best... 'Be prepared!' If you do your homework your photos will show it.
Where To Find Butterflies
Canada

Equipment for Butterfly Photography
Use a macro lens of 50 - 200 mm. My macro lens is a Nikon 105 mm. (f2.8).
No macro? Use a good quality telephoto lens with an extension tube if you have one. Be warned - not all SLR cameras and lenses work with extension tubes. Before you run out and buy one, check your manual or the internet. .. speaking from expensive experience here!
You absolutely need a tripod
for butterfly photography at night or just after sunrise but it won't help very much
if you're photographing butterflies during bright
daylight when they're most active.
And please, no flash! On-camera flash makes ugly flat light and awful shadows. Probably scares the wits out of your butterfly, too!
If you don't have a
macro, many camera shops rent photography gear. A
good tip if you plan on buying another lens! Try it out before you
buy. A good lens will set you back a big chunk of money so don't buy
one that doesn't give you the results you're looking for!
Nail Your Exposure
You'll need a fast shutter speed for butterfly photography---> 1/250th or faster. Turn on the lens Vibration Reduction when you're hand holding your camera.
The
camera companies claim VR gives you the equivalent of using a shutter
speed 3 stops faster, but many photographers say only count on 2 stops.
Use an aperture of about F8.0. There are exceptions to this if you're knowledgeable about exposure and you're in your "creative space".
For a refresher on mastering your Exposure, here's the information you need:
The closer you are to a subject... like when you're using a macro, the skinnier the plane of focus. I'll show you...

Look at this butterfly's wings... the edge isn't in focus. It's on a different plane than the right wing.
wide aperture = narrow plane of focus.
My aperture is f/2.8 - bad choice in this case. The aperture is too large because he's moving his wings in and out of the plane of focus.
There are lots of other factors here, but one major factor is aperture (f-stop)....
Think of your scene as a loaf of bread with really thin slices...a wide aperture - for example
- f/2.0 on my macro lens, will let me focus on two slices of the loaf
- f/3.2 brings three slices into focus.
- f/22 equals all slices in sharp focus.
When I snapped the photo, the left wing wasn't on the same plane as the right wing). f2.0 doesn't give enough depth with the butterfly moving his wings in and out of the plane of focus.
I wanted all of the butterfly sharp so a better aperture would be f8.... a bit of a guess and a couple of trials.... f5.6 ... f8. Enlarge the image on the camera's LCD and check the entire butterfly at 100% to make sure it's completely in focus - keep the background blurry.
Details Are Important
This painterly image was created from my second photo of a Large Tree Nymph butterfly. There were 2 problems with the first image...
- The wings were torn. A common problem in butterfly photography. You want to choose a perfect subject but these insects get old and battered quickly.
- The background was too high contrast. That's because it was a hot, sunny day and there were shadows as well as speckled sunny/shadow areas. Even though the background is blurred, it's still distracting.
So, how did I come up with this picture?
- To deal with the torn wings, I 'cropped' them out of the frame by getting closer to the butterfly. His wings look like they're flawless now.
- I used 3 texture layers in Photoshop and adjusted them with different blending modes at different opacities. That dialed down the contrast and gave me a painterly look. I achieve my goal. What do you think?
 Large Tree Nymph butterfly at Victoria Butterfly Gardens. Cropping out the damaged wings and adding several textures to create a 'painterly' picture.
Where To Focus
The goal in butterfly photography is to get both the butterfly and the flower (or the part that the butterfly is on) in focus and the background out of focus. Whatever is sharp attracts attention... and you want your viewers' eyes to rest on the subject!
For all animals, focus should be sharp on the eyes. When you get eyeball to eyeball with a butterfly, you MUST have
absolutely perfect focus or it's trash! So use your tripod!
This is a close-up using my Micro Nikkor 105 mm lens and the photo includes only butterfly wings. These butterflies are sipping the juice from bananas and oranges.
Since the lens is so close the wings, the DOF (depth of focus) gets more and more narrow. Even if I close the lens down to f 22, the focus is limited.
Check all of my little friends out in my butterfly photography video at Victoria Butterfly Gardens.

Focus
... let's be clear on the subject
Switching to manual focus might sound like a good idea, but don't... it's a whole lot of work with butterflies.
Setting it to auto isn't your best choice either. Butterflies flit around like drunken sailors so the focus mechanism just keeps on working... and working!
I find it really irritating to listen to the noise while it spins its wheels! And the sound scares away the butterflies!
There's also another, better choice in your camera settings. Your point and shoot camera may have a focus setting that "follows" a subject (continuous focus). Check your manual for your automatic focus options ("tracking moving subject") because it simplifies the process.
My Nikon DSLR has a focus that tracks movement and constantly makes the right adjustments. I use that setting for my butterfly photography during bright daylight when these little critters are most active.
When you're photographing butterflies, try to find perfect specimens. Butterfly wings get awfully mangled during their short life spans.
Something else that could be better? The background... it's not soft and blurred. But, hang on to that thought for a minute.
I didn't want to give up on my friend here because he wasn't flying away and he really is incredibly handsome!
So I tried another picture and kept my fingers crossed that he wouldn't take off... and he didn't.
I ended up with a nice close up photo that cropped out the tattered edges of the wings and applied painterly textures in Photoshop. Nice pastel colours from the textures take away the high contrast of the leaves in the bright sunshine.
Fine Art Prints and Note Cards
Many of my butterfly images on this page, as well as many more beautiful flowers from all around the world are available as both prints and note cards. Browse and find your favourites. Several flowers and bees as well. :) Click on the images below to browse.

I love living here, ocean-side on Vancouver Island. So, you'll also find lots of lovely impressionist images of the fishing boats, sea shells and our indigenous animal life as well as the flowers. How do you like the artistic touch I give my photos? The unique painterly style is a reflection of how I feel about the scenes.
If you would like a picture that you don't see in my "print shop", contact me and I'll be happy to let you know if it's available in the size print that you need or as a note card.
I'm happy when people appreciate my work. And, if you have a comment, positive or negative, please leave one at the bottom of any page or contact me.
Composition

REPETITION:
- lines in the stems with the lines in the wings
- circular patterns in the yellow leaves and purple flowers
- stripes of black and yellow in the butterfly’s body
- black / yellow stripes in the wings
- black “veins” in the wings
- colours - yellows in the foliage and butterfly wings
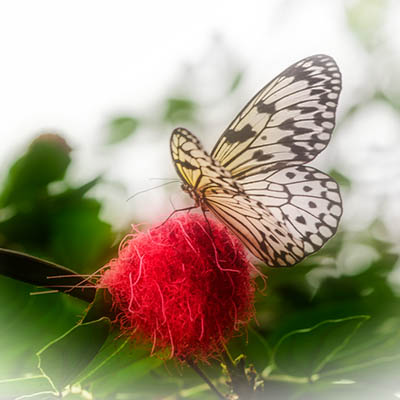
Looking at the image some more, there's an interesting V-shaped angle here. It meets in the lower left corner of the photo. I drew a line along the outer edge of the butterfly's wings and another line along the phlox stem and you can see a nice angle.
 Lots of parallel lines. Lots of parallel lines. |
 "V" coming from the corner. "V" coming from the corner. |
And my last edit for this photo... I cropped the photo just a teeny bit so that the large stem comes out of the corner of the image.
For some help on Composition, start with these pages:
Backgrounds

SIMPLICITY - Keep your backgrounds simple with butterfly photography. Busy backgrounds are confusing... even if they're blurred. When you're looking through the viewfinder and your eye goes to something in the background, change your angle. Move around and get it out of the scene.
A lot of cameras have a preview button you can press to see what the depth of field will actually look like before you press the shutter. Check your camera manual to see if your camera has one.
DISTRACTIONS - Run your eyes around all four sides in the viewfinder. Branches, stems or anything else that stands out, can create really confusing lines. You don't want a dark twig "growing" out of the butterfly's head or from a vein in his wing.
... when it's all good, press the shutter.
do you think about this background? What attracts your eye?
I have a problem with the dark stem across the middle right side. It looks like it's growing out of the butterfly's wings. My eye goes straight to it and it's annoying.
I don't like the contrast of the dark leaves on the light background either!
If I'd been able to photograph just the butterfly and the flower on the light background it would be nice. Healing it in Photoshop isn't worth the time and effort. Luckily, I was able to move around and shot from a different angle and that image worked out just the way I wanted.
 Niagara Falls Butterfly Gardens, a painterly Dryas Julia drinking nectar from a flower. Topaz Suite.
CHANGE YOUR POINT OF VIEW - Take your shots from as many angles as you can get.
Get under your butterfly.... you'll catch a great shot of the body. The patterns and colors on the underside are dramatically different than the top side.
Aim from above, when the butterfly stretches its wings out and the colors will be intense with gorgeous patterns.
Best Times for Butterfly Photography
... Timing is everything
DAY TIME
Most people like photographing butterflies when there's bright light. Bright enough for a fast shutter speed! A lightly cloudy day is perfect for catching rich colors in butterfly wings, foliage and flowers.
The down side is that butterflies are most active during the day! That means you should be comfortable with manual focus (or your camera's auto "subject tracking mode"). You MUST hold your camera steady.
Ah yes... you have to have the patience of Job with these little critters!
Very important also, don't let your shadow fall on the butterfly. Two reasons for that. You may frighten him away and you've darkened the scene and changed your exposure.
Butterflies "spook" easily so move slowly and be quiet. Daytime is when you find out what "chasing butterflies" is all about. Move too fast and you'll frighten them off, move too slowly and they're gone before you can even focus.
NIGHT TIME
... a much different experience. The challenge here is finding them in the dark. They're in the same areas they frequent during the day, anywhere from the ground on upwards into the bushes and trees but you have to have sharp eyes!
In one way, butterfly photography is easy at night... they have low metabolic rates when it's dark. As long as it's dark, they're very still. Once you find them, they're not going to fly away.
Their wings will be closed so you'll be able to get some excellent side shots. No open wings at night, though.
You've absolutely got to use your tripod in the dark! You'll need long exposures... keep checking your histogram and adjust your shutter speed so you capture the most information you possibly can.
If you go out for butterfly photography at night, don't be tempted to touch their wings while they're so still. They're oh so delicate! You'll rub off the small scales and make it hard for them to fly. So look but don't touch!
SUNRISE
... if you're not keen on night photography. Get out before dawn and catch 'em while they're just waking up. They're slow risers! They stretch their wings wide open... just like we stretch when we first get up. They're slow enough so you can use your tripod and the light has a gorgeous "warm" glow. I think it's the best time for butterfly photography!
Night and sunrise aren't options if you're visiting a butterfly garden or butterfly conservatory. They won't be open. You'll only have daylight hours and the butterflies will be active.

Best Places for Butterfly Photography
Butterfly Gardens are the best locations for butterfly photography
- Victoria Butterfly Gardens on Vancouver Island, BC, Canada
if you want to visit their website, here it is.
- Niagara Parks Butterfly Conservatory, Niagara Falls, ON, Canada
- Check the internet for migration routes and times of year they're on the move.
- What about the amazing Monarch Butterflies and their journey. Download a free PDF to learn about the life of these little marvels of nature.
- Plant some butterfly "magnets" in your own garden. Different species are attracted to different plants. Your local botanical or butterfly garden staff would be the ones to talk to about that.
- But generally, you'll find them hanging around lilac, dogwood, buddleria - the butterfly bush, honeysuckle, lavender... and the early flowers - primrose and polyanthus.
- Parks and gardens are always a good bet.
- A wildflower meadow is a great place for good butterfly photography.
- And you can also try along rivers or streams.
Hope these tips help you out... Happy hunting!
If you liked this page, you'll also like these...


Flower Photography Home › Butterfly Photography
SUBSCRIBE & STAY IN TOUCH
SUBSCRIBE & STAY IN TOUCH
Recent Articles
-
These Heron Images Make Stunning Fine Art Prints Or Note Cards
Jan 29, 19 06:49 PM
 I love my heron images from here on Vancouver Island. One particular pair of herons are always obliging models. They're relaxed and trusting while I photograph and talk to them.
 -
Your Histogram Makes Correct Exposure a Breeze
Jan 22, 19 05:23 PM
 A histogram is easy to read with a bit of practice. An effective tool to help you get the picture you imagine.
 -
Yeomiji Outdoor Gardens, Asia To Europe Without The Jet Lag
Jan 22, 19 04:33 PM
 Yeomiji outdoor gardens delivers a French, Italian and Japanese garden along with several culturally significant Korean gardens.
New! Comments
Please leave me a comment in the box below.I'd love to hear your stories, share your photos and read your comments about this page.