the Exposure triangle
... Meet the Big Three
Proper exposure is critical to good photography and all of us want to create properly exposed, compelling photographs.
The most important reason is that our photos record the precious memories of our lives... a picture journal of so many special moments in time that we don't want to forget.
So, take the time to understand some basic principles, practice and experiment with your camera. Then...
You'll be so thrilled with how your photos improve that you'll want to share them with every one of your friends and family.
glossary of terms:
- Aperture or F-stop: The aperture is an opening inside the lens that becomes larger or smaller to change the amount of light entering the camera. It controls how much of the scene is in acceptable focus.
- Depth of field or DOF: The distance between the nearest and farthest objects that are acceptably sharp in an image and determined by the aperture.
- ISO: System of measurement used by the International Standards Organization.
It quantifies the sensitivity (speed) of a film emulsion or a digital
camera's image sensor to light. A normal range is 100 ISO up to 6400
ISO. And, according to Nikon, a possible range up to 204,800. A higher ISO can introduce noise into the photograph.
- Shutter Speed: Determines whether a subject is sharp or blurred. The shutter covers the sensor. Once activated, it moves across the sensor and allows light to reach it for a specified amount of time.
You'll meet three very important elements that work in partnership to
create a unique exposure for the particular photo you want to create.
They're the same three components whether you shoot digital or film,
though some details are slightly different.
The Big Three work in sync to give you just the right amount of light for your film or your sensor to capture the detail you want. A landscape has lots of detail, a silhouette very little. Your photo - your choice!

ISO - Exposure Element #1
Frans Lanting calls ISO the Great Enabler, which is my reason for placing it in the top position. (Frans is an amazing photographer who works for National Geographic and other prestigious nature magazines.)
What he means by 'enabling' is that by changing ISO settings to make the sensor more or less sensitive to light, you get more freedom to make creative exposure choices with your shutter speed and aperture.
I shutter to think how many people are underexposed and
lacking depth in this field. - Rick Steves
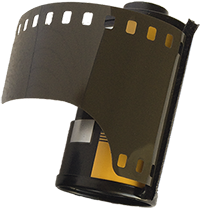 |
Film is a chemical medium... the chemicals are sensitive to light. You could buy film in 24 or 36 exposures. Some film has been discontinued with the popularity of digital cameras. |
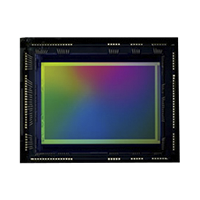 |
A sensor is electronic and sensitive to light. A DSLR has ISO settings anywhere from 100-6400. Some cameras have ISO 12800. Increasing speed (higher number) causes increased digital noise. |
Both film and digital sensor ISO almost always double in number. Mostly, film speed runs 50, 100, 200, 400, 600, 1600, and 3200. There are exceptions....
Such as Ilford H4 film, a bit of a black sheep with an ISO of 125... one of my favorite films.
The larger the number, the more sensitive the film or sensor is to light... 800 or1600 are good settings for night shots. Typically, the less sensitive 100 or 200 ISO is for bright daylight photography.
- In film, higher ISO has more grain... every film has it's own style of grain and photographers might choose a specific film (brand and ISO) for certain types of photography. I had my favorite films, especially for black and white.
- With film, if you want to change the ISO, you have to change the film. It can be done, saving the frames that aren't exposed yet, but it's a pain! Changing has to be done in total darkness and you have to wind it to the proper place when you reload it so you don't expose film you already shot.
- With your digital camera, you can change the ISO as often as you want with a quick and easy adjustment. No big deal!
- Depending on the quality of your DSLR, as well as the faster you set your sensor, the more noise it produces. It's not the same look as film grain and programs like Lightroom or Photoshop can fix noise to a certain extent.
Aperture - Element #2
... shallow or deep?
The aperture is built into the lens and the range of apertures is often different for different lenses. Your choice of a large or small opening determines how much of your image is in sharp focus.
|
Just like the iris in your eye... the iris dilates (opens up) to let more light in and constricts (gets smaller) to decrease the light coming in. The iris can expand and contract because much of it is muscle. Think about how tiny the pupil in your eye becomes when you're in bright sunlight and how huge it gets when you've been in a dark room. The pupil is the "black hole" right in the middle of your eye. |
 |
If your iris didn't constrict when it was exposed to bright light, you could damage your eyes permanently. You can also damage your sensor by pointing it at the
sun... so don't!
Just a warning :-)!
The red rose photos give you an idea of how to use your aperture. You'll want to learn more about aperture and shutter speed so you know the difference and how to use them.
 |
I used a wide aperture of f 5.6 Look at the second rose. Is it in sharp focus? A large aperture gives you a narrow depth of focus. I focused on the first rose so the one behind it's blurry. |
 |
This time, I closed the aperture way down to a tiny opening of f 22. Both beautiful red roses are in focus and so is the silk. Get to know aperture here. |
From the rose photos, you get the idea that:
- APERTURE - controls how much of your scene is in focus.
If you're out shooting a mountain landscape, you'll want all the scene in focus... the foreground, middle and background. Same if you shoot architecture.
But, if you're taking a portrait of your girlfriend, you'll want her in focus, and the background blurred.
In a minute, you'll see that:
- SHUTTER SPEED - controls whether a moving subject is in sharp focus.
Shutter Speed - Element #3
... Tack sharp or blurred?
Shutter speed is most important when we're photographing a subject in motion.
Want blur? The choice is a slower shutter speed.
Need to freeze action? You'll want a fast shutter speed to stop movement in it's tracks!
If you're a sports photographer, your subjects are usually in motion. If you're shooting for a newspaper or magazine, you want to freeze the action. Otherwise, you can choose to be creative and blur your subjects.
Try panning a moving subject - keep the subject sharp and blur the background. There's more information here about panning in the article on shutter speed.

If you want to set a specific shutter speed, you can use your digital camera modes, and Shutter Priority is the one you want. Find out more about camera modes here. That means that whatever shutter speed you set... the camera will not change it. It will change your aperture to get the correct exposure
WARNING: this camera mode is sometimes a bit tricky. The camera can't always supply a correct aperture. Most cameras have some kind of warning when that happens, but you may not realize and your resulting picture might be over or underexposed.
Get more acquainted with shutter speed here.
Related pages that will interest you
Your Camera's Light Meter
... Usually honest, but lies on occasion!
Cameras have a built-in light meter to gauge the light coming in through your camera lens. Is the correct amount or do you need to make some adjustments?
If you're dialed in to "Auto", the camera's going to do all the calculations and make important exposure decisions. When you look through your viewfinder, you'll see your meter, which looks very much like this...
 |
In Auto, your camera will set what it considers the correct exposure and the marker will be at 0. Your meter measures light in the scene and averages it out to 18% grey. |
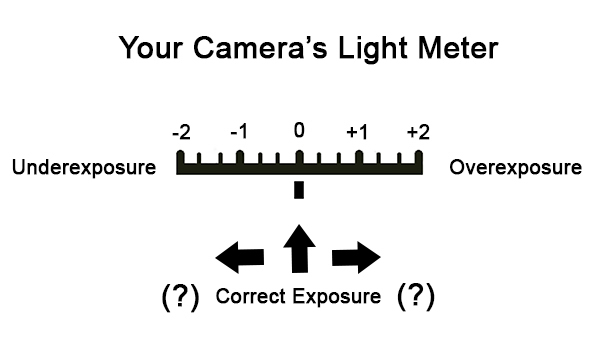 |
Your camera isn't always right! There are tricky light situations and your light meter will feed you bad information. That's where exposure compensation comes into play. You're in control again. |
|
Exposure compensation allows you to dial in extra light or subtract light from the exposure your light meter sets. You can use it in Manual as well as the semi-auto digital camera modes: aperture priority , shutter priority and program mode - but not in Auto. |

Examples of very tricky situations:
If you don't take over the wheel, your snow (and other light scenes) will be too dark and your dark or night scenes will be too light.
The Histogram - A Nifty Tool
|
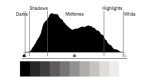
Your camera's histogram can't be beat for nailing the exposure you want. Don't really know what a histogram is? See the little graph on the back of my camera ... to the right of the rose? This shows the luminance of all the tones in your image. |

Luminance just means brightness. It's the histogram I usually use, but you also have an RGB histogram that shows the color information (Red Green Blue).
Your histogram tells you if you're overexposed or underexposed and need to make adjustments.
Every histogram is like a fingerprint. It's unique to it's image.
For help with the histogram, this is the place to go.
If you want more information, go an visit David DuChemin's blog. This is an article he wrote on exposure and metering - he gives some good information about the histogram.
Wrapping It Up
There's a lot of information on this page alone. Take the time to go over each of the additional pages on every subject.
Exposure is the most important basic photography concept. It requires some concentration and then practice. Master it!
If you get comfortable with setting your exposure, then you have more time being creative in other ways. If you botch your exposure, there's no way to recover it, especially disastrous if you shoot JPG and not RAW.
Photoshop can't magically resuscitate an inferior image.
To learn more about exposure and so many more aspects of photography, consider joining my photo class on exposure.
Please leave a comment below on what you've learned or any topic you want to know about. And if you enjoyed this page, it would be super if you'd "like" it.
All this helps me know how to create even more great content for you.

Flower Photography Home › Exposure
SUBSCRIBE & STAY IN TOUCH
Recent Articles
-
These Heron Images Make Stunning Fine Art Prints Or Note Cards
Jan 29, 19 06:49 PM
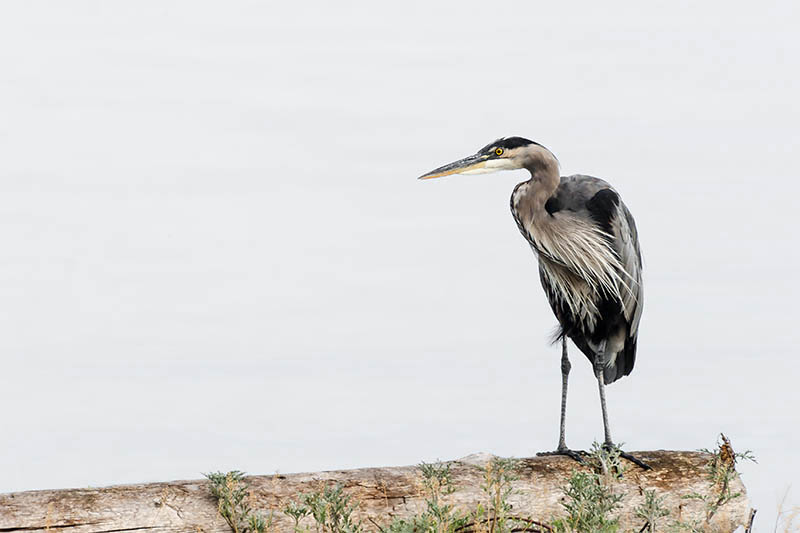 I love my heron images from here on Vancouver Island. One particular pair of herons are always obliging models. They're relaxed and trusting while I photograph and talk to them.
 -
Your Histogram Makes Correct Exposure a Breeze
Jan 22, 19 05:23 PM
 A histogram is easy to read with a bit of practice. An effective tool to help you get the picture you imagine.
 -
Yeomiji Outdoor Gardens, Asia To Europe Without The Jet Lag
Jan 22, 19 04:33 PM
 Yeomiji outdoor gardens delivers a French, Italian and Japanese garden along with several culturally significant Korean gardens.
New! Comments
Please leave me a comment in the box below.I'd love to hear your stories, share your photos and read your comments about this page.