What Is Shutter Speed
.... and why is it important to me?
Have you ever wished you could control your digital camera shutter speed?
First, let's get you out of "Auto" so you have control of your exposure. Dumping "Auto Mode" is the way to create consistently winning photos.

I was in Kailua-Kona on the Big Island of Hawaii. This is a first attempt at photographing surfers.
About a dozen surfers were sitting on their boards near the shore, waiting for the waves. All of a sudden... bingo, up they came!
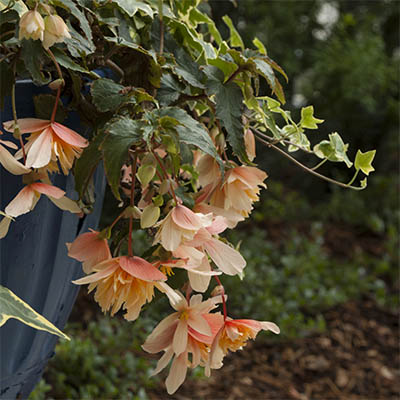
I shoot things in nature that usually tend to stay fairly still.... like flowers. And I'm so glad I gave it a go. Not bad for my choice of 1/250th for my shutter speed.
Take time to watch this video. I talk about the exposure triangle, shutter priority camera mode and look at a variety of photos taken at different shutter speeds. When you complete the video, download the script of the PDF and keep reading to the bottom of the page.
The Exposure Triangle
... Here are the 3 ingredients in the exposure recipe. The amounts will vary!
You can manipulate any one, or all of the members of the exposure triangle to achieve the correct outcome you need for your photo.
- ISO - decides how sensitive the sensor or the film is to light. ISO in digital cameras generally runs from 100 to 3200, maybe 6400. Film also comes in ISO 50. Least sensitive to light is 100 (or 50) and we use the setting for bright daylight or bright studio lighting. The most sensitive to light is 6400. 800 or 1600 is used at dusk or for night sky photography.
- Aperture - relates to how much of your scene is in sharp focus in your photo. It's called your Depth of Field. In landscape photography, it's usual to have the foreground, mid-ground and background in focus. But a portrait of a person, pet, flower etc. should have a blurred background and only the subject in sharp focus.
- Shutter speed - controls sharpness or blur for subjects in motion.

Do These Numbers Look Familiar?
... If they don't now, they soon will!
When you look inside your viewfinder, several numbers will come up... let's look at what those numbers could possibly mean.
Some cameras have 8000 as their top speed, but not all. Your camera might top off at 4000.
One confusing idea is that the speed is actually 4000 but it's not! It's simply understood that all the numbers from 8000 down to 2 are actually fractions.
For example:
- 4000 is really 1/4000th of a second
- 8 is 1/8th of a second, and
- 2 is actually 1/2 of a second.
See the funny " marks after the bottom numbers? The squiggly lines mean "seconds". So...
- 1" means 1 second
- 4" equals 4 seconds, and
- 30" is 30 seconds
So, is 4000 a larger number than 2? No! Not if we're talking about your camera shutter, our larger number is 2. A half a second is MUCH larger than 1/4000th of a second.
Try cutting 1/4000th of a pie. Or just think about every one of your photos taking 250 or 1000 seconds! That's an awfully long time.
And is 30 larger than 1.... Yes! Because these aren't fractions.
Tricky, huh? You're a pretty smart cookie so you'll get used to it.

What's A Stop?
It's a relative measurement of light. There's 1 stop of light between 250 and 500. If I change (only) my speed from 500 to 250, then I'm letting in 1 more stop of light.... which is double the amount of light that was coming in to my sensor.
If I change my speed from 250 to 500, then I've decreased the amount of light by 1/2 but it's still 1 stop of light.
Changing by 1 stop of light will either increase your light by
double the amount, or will decrease the amount by half.
 1/60, aperture f 8 and ISO 200 1/60, aperture f 8 and ISO 200 |
 1/125, aperture f 8 and ISO 200 1/125, aperture f 8 and ISO 200 |
Two pictures of pretty peonies on a friend's patio. The photo on the right (1/125th of a second) has a stop less light than the photo on the left (1/60th of a second... the amount of light decreased by 1/2.
So the photo on the left has 1 stop more light than the photo on the right.
Best Shutter Speed
... a few examples to start you out
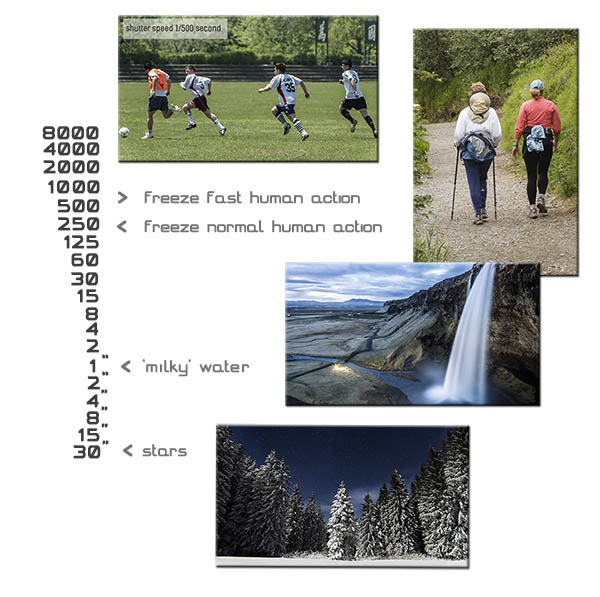
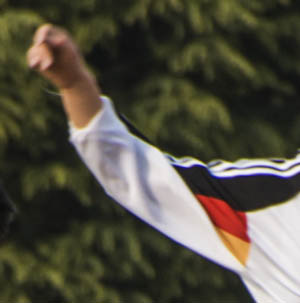
Fast Shutter Speed
The faster the action, the faster the shutter speed.... if you want to freeze that motion.
The combination of your shutter speed, ISO and aperture, must give your camera an adequate amount of light. If your light meter tells you that there's not enough light to use the combination you want, then you'll have to sacrifice something.
If you made a creative shutter speed choice and you really want to stick with it, then try increasing your ISO. Then your sensor will be more sensitive to light and you'll need less of it. Or you might decide to sacrifice the aperture and open it up a little more.
 |
 |
The more available light, the better, because then you can make exposure decisions without being so limited.
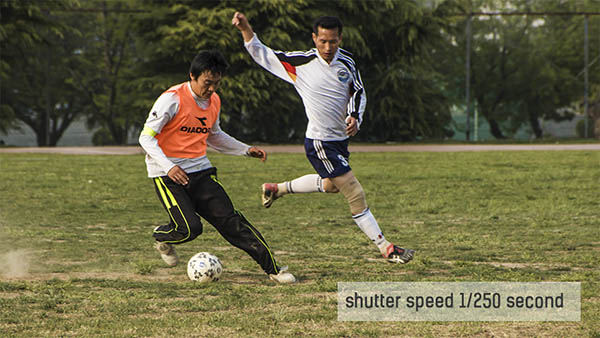
When you're shooting faster action, like soccer, don't use a shutter speed that's overkill because you're limiting your range in your aperture. If you don't need 1000, don't use it! For sports like soccer, 500 may be all you need.
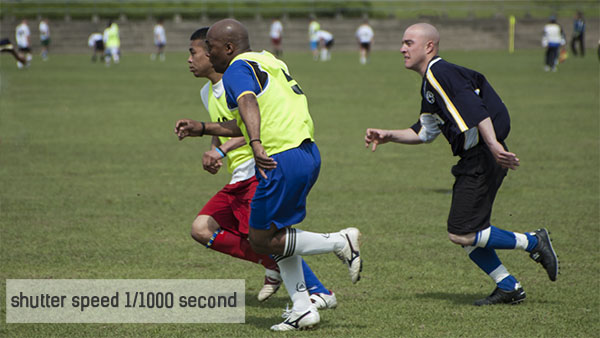
You'll have to experiment if you want to freeze a hummingbird's wings. Try 1/1000 and then 1/1500 (half a stop). Just so you know, your camera's LCD will not show you the true sharpness of your image, even if you enlarge the photo to 100%. It's not a true representation.
Check your focus when you transfer your images to your computer and view it at 100%.... so you'll either be pleasantly surprised at how well you froze the motion or making plans to go out and try again!
The shutter speed needed for the job will vary... where did you catch the wings in their cycle? At some points, the wings are slower. Is the bird flying toward you or across your point of view? And how far away is the subject from you? More information about shutter speeds for moving objects here.
I love to look at photos of eagles grabbing salmon out of rivers and hummingbirds siphoning nectar from flowers... it's amazing to see their action frozen in time.
Not Really Fast, Not Really Slow
... Let's try in-between.
Choose 1/250 or a little slower... 180 is half a stop slower, 125 is a full stop slower. Movement across the frame, choose 250 but if your subject's moving toward or away from you, 180 or 125 could be fine. Why?
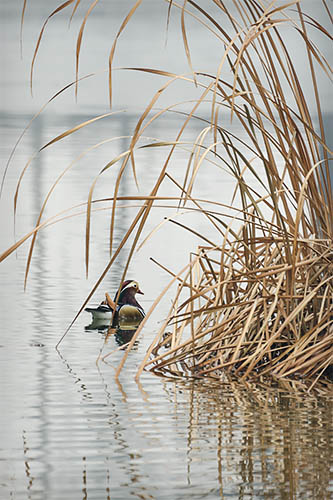 |
A pretty mandarin duck on the pond at Daegu University, South Korea. He's hardly moving at all, so I was able to use 1/60th. The little ripples the duck's making are also in focus. And the wind was almost calm so any grass movement was frozen as well. Why could I use 1/60th in this case? Because I used a tripod and all the motion in the shot was lazy and very slow. |
People in normal action, like walking and chatting in a coffee shop or window shopping, animals in normal motion, and any object moving slowly, can all be photographed in this range... 1/250th is the safest bet.
Kids and pets in high gear, joggers and sports, you'll need a faster speed, so try out 1/500th first.
Slow Shutter Speed
Now, this is the place I love to be.... where panning, creative water shots and night sky photography live.
And panning. Depending on how fast or slow your subject is moving, try panning anywhere from 1/250th (fast moving subject) to 1/8th second (slow moving subject).
 |
I panned my camera to get this photo. I was in Denver. This is one of several carriage horses. I focused on the harness on his shoulder, followed his motion with my camera, and pressed the shutter ... gently. (1/8th sec.) |
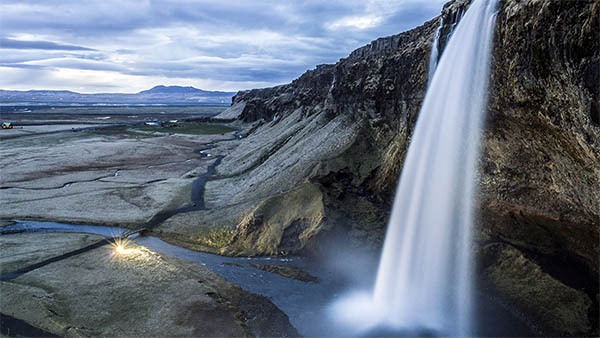 |
To get that ethereal "milky" water, use 1" or slower. This waterfall photo is from unsplash.com - photographer Pierre Bouillot. Thanks Pierre! |
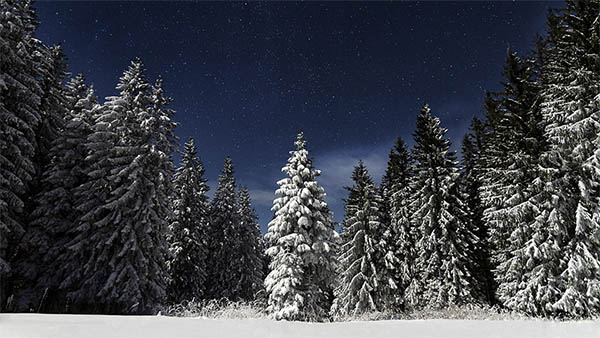 |
Photographing stars needs a moonless night, away from city lights. Use 25" or 30". This photo also from unsplash.com by Paul Itkin. Thank you Paul! |
You'll find some great advice about creative shutter speed here.
Auto Camera Modes (P, S and A)
... They give you slightly more control
You decided what shutter speed you want to stick to for some creative photography. Fantastic! But in full AUTO, you can't control it.
I have a fix that's one-up from AUTO. You might want to try Shutter-Priority (or Shutter-Preferred). Choose the "S" on your mode dial. When you lock down your shutter into a specific speed, the aperture will change according to what your light meter determines is the best exposure.
This is what it looks like on my Nikon.

I must warn you about shutter-priority. It has one drawback. Your camera may not be able to get a correct exposure... it could run out of apertures to choose from! But your camera will warn you in some way... a beep or a blinking warning.
If you still take the shot, your photo will be overexposed or underexposed. When it comes to that, try changing your ISO to compensate. Remember, it's a dance between these 3 elements and you can juggle one or all.
How To Hold Your Camera
|
Learn
how to hold your camera properly stay steady. If you
aren't steady, use a tripod. Hand-holding your camera takes a bit of practice. It might feel a little awkward at first but you'll soon see how much better your pictures are. It's important to hold your camera correctly since unintentional blur from movement of your hand, or your subject, will ruin your photo. Hold the hand grip on the right side of your camera firmly with your right hand. |

Then hold your left hand, palm upwards and thumb away from your body. Cradle the lens in your palm and hold it, but don't choke the poor thing!
Your thumb is toward the top of the lens... now your thumb and index finger are free to manipulate the focus ring.
Keep your arms tight in to your body... no flapping wings, please. Your feet slightly apart for steadier balance.
Want an even firmer stance? Sit on your butt and rest your forearms on your knees. Or lay flat on the ground on your stomach with your elbows on the ground...that creates a solid base for holding your camera.
Rules, rules and more rules... here's another one! This is called the hand-holding rule of thumb.
To reduce movement, even when your camera's on a tripod, use either your timer or an electronic shutter so your hands aren't touching, and that means moving, your camera at all.
A Rule for hand-holding your camera.
There seems to be a rule for everything... so here's one more! The rule of thumb for hand-holding your camera.
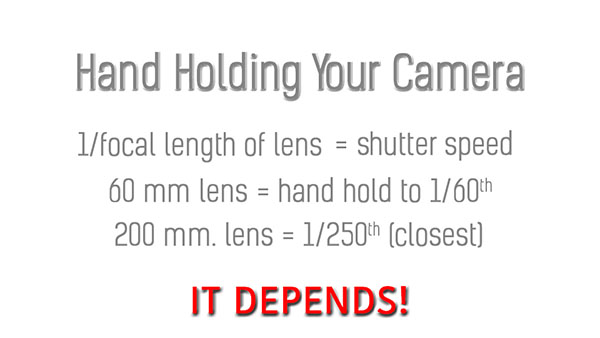
What lens are you using? Say 35 mm? Alright... you can hand hold your
camera down to a shutter speed of 1/30th. That's the closest.
Like the nice big red "IT DEPENDS" says. if your hands shake, you're going to have to experiment with hand holding your camera.
If you have a lens with VR (Nikon's Vibration Reduction) or another brand with a similar technology, the lens manufacturers claim that you can hold your camera for another 2 to 4 stops. Again, experiment. You'll have to check your photos on your computer at 100% to see where your hand holding is safe.
And, always..... yes, always, have your tripod with you if you really want that shot to be amazing. Believe me, I know exactly how it feels to carry a tripod around with you up mountains, through cold wind and snow and in the rain.
But, the question is, how much do you want a super shot?
Wrapping It Up
This is a wrap.
I know you've learned a lot here. Maybe TMI... too much information? Now, it's up to you to put it into practice. Take a little at a time and allow it to digest.
Please let me know if you're stuck on something and I'll help you out. Use the comments section at the bottom or go to my contact me page.
Please leave a comment below on what you've learned or any topic you want to know about. And if you enjoyed this page, it would be super if you'd "like" it.
All this helps me know how to create even more great content for you.

Flower Photography Home › Exposure › Shutter Speed
SUBSCRIBE & STAY IN TOUCH
Recent Articles
-
These Heron Images Make Stunning Fine Art Prints Or Note Cards
Jan 29, 19 06:49 PM
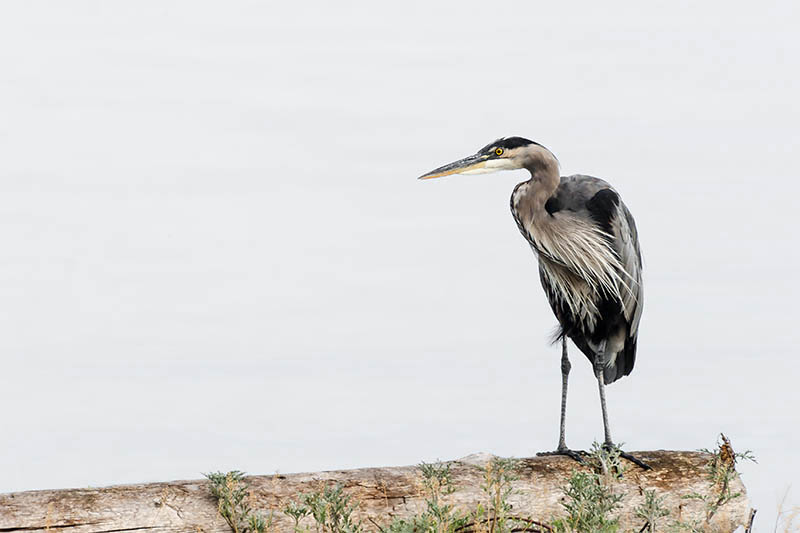 I love my heron images from here on Vancouver Island. One particular pair of herons are always obliging models. They're relaxed and trusting while I photograph and talk to them.
 -
Your Histogram Makes Correct Exposure a Breeze
Jan 22, 19 05:23 PM
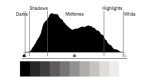 A histogram is easy to read with a bit of practice. An effective tool to help you get the picture you imagine.
 -
Yeomiji Outdoor Gardens, Asia To Europe Without The Jet Lag
Jan 22, 19 04:33 PM
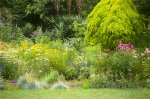 Yeomiji outdoor gardens delivers a French, Italian and Japanese garden along with several culturally significant Korean gardens.
New! Comments
Please leave me a comment in the box below.I'd love to hear your stories, share your photos and read your comments about this page.