Spring Bulbs
Fair Daffodils... You Haste Away So Soon
The spring bulbs are blooming here on Vancouver Island.... thankfully! It's been a hard, cold winter by Island standards. It's so heart-warming to see the crocuses, daffodils and lots of other bulbs breaking into blossoms.

When I lived in Vancouver, VanDusen Botanical Garden was my go-to garden. I love the colour combination of blue, green and yellow in this image.
I love playing with layers and textures in Photoshop and I ended up with 8 layers of textures for these white crocuses. The image looks old and cracked like an old painting.
Shooting from above a flower isn't always a good idea. The soil is the background... not
flattering for pictures. With a flower that looks up to heaven, like these crocuses, it works with the texture layers.

At VanDusen's, the daffodils and crocuses bloom at the same time as the cherry blossoms. For this photo, I got down low,
right on the ground and pointed my camera up at the daffodils. That way, I caught the cherry blossoms and other flowering bushes in the
background. I, blurred the background using a wide open aperture. Need help with
If you aren't using Manual yet, try using the 'semi-auto' digital camera modes. To create background blur, you want to use Aperture Priority.
Getting down to the level of the flower is another option. A lot of spring bulbs are quite small so you may feel a bit silly but don't worry. That's how I photographed these daffodils.
Unfortunately, the grass was really wet and my jeans soaked up the dampness. A small price to pay for several nice photos.
Heliotropism
... Use the sun to plan your shots
Have
you ever noticed how plants follow the sunlight during the day... they
swivel so they always get a good view of the sun. If you're a gardener,
you've seen your flowers move over the course of a day. Sunflowers are great examples.
The behaviour is called heliotropism. Houseplants grow towards the light and its a good idea to keep
turning them so they grow evenly. Know where the sun is at certain times of the day in your garden and you can plan the time you want to take your photos to get the background you want.

If you know when your flowers are going to be staring at the sun... or, if you want to catch them from the side. Like this shot of white daffodils. I focused on the centre flower and used a large aperture (f 4.0) to blur all the other flowers.
If you shoot RAW (instead of JPG), you're going to do at least some tweaking in your photo editing program. RAW is the equivalent of a negative and a RAW file always needs a little something.
Spring bulbs close up
... use your macro lens if you have one
Looking through a macro lens is intriguing. Macro and close up are not quite the same thing. You can get some amazing close-up shots with a good quality lens but a close up isn't a true macro image.

With such a shallow depth of field (DOF), the only sharp parts of this photo are the edge of the frill, the pistil and filaments. They're all on the same narrow"slice" in space and I focused on the edge of the frilly cup. I had to move just a bit to include the pistil into sharp focus.
When
you look through the viewfinder or at your screen, take your time and
check all the details like focus, background (any trash), close enough
or far enough away. You can do all that successfully if you have your
camera in a fixed position on a tripod. If you use a macro lens, you need a tripod.
Photo Editing - Express Yourself
Your photos reflect who you are. Be what you want to be. Even if you're a realist, you can have fun playing with a photo-editor. I don't process all of my photos in an artistic painterly style. Some I only apply basic adjustments in Camera Raw.
But many of my photographs are impressionistic. 'Painting' my photos lets me play and express my own style in my photos. It makes my pictures unique to me.
I use Lightroom, Photoshop, and Topaz Impression. I've also used ON1.
Don't be afraid of editing programmes. You computer comes with one and if you outgrow that particular programme, move up to a more advanced software. Go through the lessons that come with your photo-editor or search YouTube for help. The point is to enjoy the process while you learn.
Layers and textures
... lay it on thick
Textures are so much fun. When I'm out with my camera, I always find some surfaces or scenes that would make topnotch textures or backgrounds for my images. Maybe an interesting sky, the side of a rusty building, the bark on a tree. Use your imagination.
You'll need a photo editor that uses layers. Photoshop is my editor of choice but you can find other photo editors that don't have such a steep learning curve. OnOne software is free if you want the programs that came before Photo Suite 9. Older doesn't mean inferior! They're incredible so check out the freebies.
|
These spring bulbs are grape hyacinths. I gave them 2 texture layers... the 1st layer is a linen fabric and the 2nd is an aged piece of paper. It looks like the photo is printed on an old piece of linen with tattered edges. The linen was blue so it changed the brilliant coloured greens. And the paper was brown so the combination makes the image look very old. This image, with the various layer additions, was edited in Photoshop. |

A hint when you're working with your original files. You don't want to alter your originals. Don't make the mistake of working on one, then saving it. If you do that, and you close the file, it's gone.
Make sure you always work on a copy or use the "save as". There's nothing quite as sickening as when you realize you hit "save" and lost your original file.. forever. Easiest answer... always open and work on a copy.

I lived in Surrey, BC for a year, between overseas jobs. Green Timbers Urban Forest was close by. I spent a lot of time running or taking photographs there. It's temperate rainforest, a unique environment.
All the spring bulbs bloomed at the entrance to the forest. All kinds of flowers... everyone had cameras with them. My favourite time was early morning. I enjoyed the sounds of nature before other people arrived. Deafening frog calls from the pond... "ribbit". All sorts of rambunctious bird songs, though the birds were usually invisible in the thick tree tops.
|
What's more spring than red tulips? Maybe yellow daffodils, of course. This vivid garden of spring bulbs is at Queen Elizabeth Park beside the Bloedel Conservatory. The contrast of the red and yellow leaps out from the green background. Red and yellow are hot, high energy colours... but the green is cool and relaxing. Tulips have a whole page of their own. You'll find them here. |

Vignettes
... highlight your subject
Vignetting is really a term that applied to lenses and it wasn't desirable. Certain lenses, or lenses at a certain focal length, would leave an unattractive dark circular area in the corners of the photo.
Now, vignetting has become a popular artistic touch and it's applied to either darken or lighten up the edges of the photo. It highlights the central subject.
 Orange-belted bumble bee on purple crocus. Image taken at Green Timbers Forest, Surrey, BC. Photo edited with edge lightening and white frame effect.
What better subject to highlight with spring bulbs than a bee? First time I ever saw these huge bees with red-orange butts, I had to get them on camera. Some of them were so heavy in orange pollen, they looked like they were entirely orange! They're called Orange-belted Bumble Bees.
The bees are in terrible trouble, dying off in huge numbers, mostly because of chemical sprays... neonics and others. Without the bees and other pollinators, we're in big trouble and we have an obligation to do whatever it takes to save them.
Wrapping It Up
After a cold, dull winter, spring bulbs bring back the cheer to life. They don't have long with us each spring so get that camera out, SLR, point and shoot or your cell phone camera (check out iPhoneography here). When spring arrives, make sure you always have your camera with you.
Review some basic photography, like composition (golden ratio, rule of thirds, leading lines) and exposure (shutter speed, the histogram, aperture). And take your tripod and camera manual along with you.
If you use Auto Mode, venture out a little and experiment with your digital camera modes to get more creative control over your photos.

Enjoy your spring days in the garden.

Flower Photography Home › Pictures of Flowers › Spring Bulbs
SUBSCRIBE & STAY IN TOUCH
Recent Articles
-
These Heron Images Make Stunning Fine Art Prints Or Note Cards
Jan 29, 19 06:49 PM
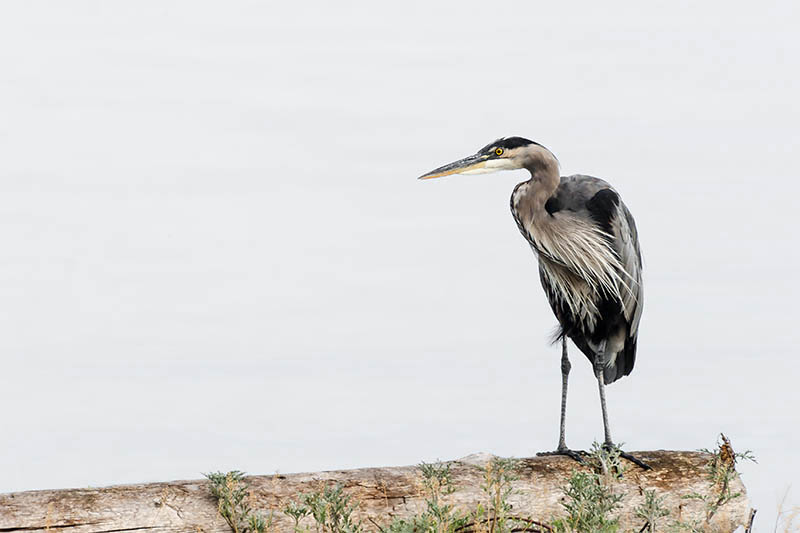 I love my heron images from here on Vancouver Island. One particular pair of herons are always obliging models. They're relaxed and trusting while I photograph and talk to them.
 -
Your Histogram Makes Correct Exposure a Breeze
Jan 22, 19 05:23 PM
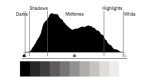 A histogram is easy to read with a bit of practice. An effective tool to help you get the picture you imagine.
 -
Yeomiji Outdoor Gardens, Asia To Europe Without The Jet Lag
Jan 22, 19 04:33 PM
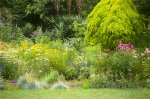 Yeomiji outdoor gardens delivers a French, Italian and Japanese garden along with several culturally significant Korean gardens.
New! Comments
Please leave me a comment in the box below.I'd love to hear your stories, share your photos and read your comments about this page.