VanDusen Botanical Garden
... How to get your photo groove on!
A picture's worth a thousand words. And VanDusen Botanical Garden is a paradise that inspires incredible photo stories. Of all the gardens I've visited around the world, it's still my favourite, right here at home in Vancouver, Canada.

Let's go on a 4-seasons' walking tour. There's a lot of ground to cover.
The 55 acre site started out as Canadian Pacific
Railway bushland. It began its transformation in 1966 and debuted as a botanical garden in 1975. VanDusen Botanical Garden has so many distinct and well-cared for gardens... it will be your favorite garden, too!
Changing Seasons in the Garden

The place is buzzing all times of the year with...
- Courses of all sorts and a Master Gardener Program.
- Flower shows and competitions - enjoy and photograph or compete.
- Craft shows spring and fall - do your Christmas and birthday shopping, or sell some garden photography.
- The yearly Festival of Lights is spectacular at VanDusen Botanical Gardens. Whatever you do, don't miss it!
- A glorious garden shop where my wish list is as long as my arm.
- Plant and seed sales - great for yourself or gifts for your gardener buddies.
- It's wheel chair accessible - get a special map from the cashier at the door to the garden.
- If you need information about your garden, call their Plant Information Line. There's a Master Gardener waiting for your call.
- Let a volunteer take you on a tour of the garden so you can plan your photography day.
- The library's a super place if you've got an interest in horticulture. Need information on the plants in your garden pictures? Are you keen on designing your garden space? Everything you need is in the library.
- So many sub-gardens - like traveling to gardens around the world, without the expense!
More than 400 volunteers feel the same passion for this garden as I do. Each of us think of it, lovingly, as our own. I hope you will, too!

Photo Editing - Express Yourself
Your photos reflect who you are. Be what you want to be. Even if you're a realist, you can have fun playing with a photo-editor. I don't process all of my photos in an artistic painterly style. Some I only apply basic adjustments in Camera Raw.
But many of my photographs are impressionistic. 'Painting' my photos lets me play and express my own style in my photos. It makes my pictures unique to me.
I use Lightroom, Photoshop, and Topaz Impression. I've also used ON1.
Don't be afraid of editing programmes. You computer comes with one and if you outgrow that particular programme, move up to a more advanced software. Go through the lessons that come with your photo-editor or search YouTube for help. The point is to enjoy the process while you learn.
|
This photograph is one of my earliest images from photography school... still my very favourite. The translucent petals are brilliant. And all the little hairs on the stems are also outlined in the bright sunlight. At the time, digital was not great and we were all shooting film. This is a 35 mm slide. Exposure has to be right on target or the image is a throw-away. A big difference from digital where you can check your histogram for your exposure. |

These poppies have very little editing applied. I used a Nikon Coolscan to scan the slide. The exposure was perfect... it only needed some minor sharpening and I added a white vignette. That's it!
Love The Fog
You'll recognize this scene from above except that photo is horizontal view. When you shoot scenes, tilt your camera and get the
image in both views. You might be surprised how much you like the vertical shot.
|
VanDusen Botanical Gardens, the stream near the Maze. This image is also edited with HDR but it's not "over the top". This foggy winter day was cool and humid and the photo editing makes it look cold. I didn't put a "glow" on since that would make the scene look warmer than it was. HDR makes the edges of the foliage sharp and that's why this image looks cold... like it felt in the garden. |

When the fog rolls in, be grateful! Grab your camera and the photo opportunity. Make a bee-line right to the scene you wanted to shoot so badly, but the background was busy, ugly or just plain gross!
Fog saves the scene... it swallows up all the cruddy details you just don't want in your photo. Buildings in the skyline, trash cans you can't move... abracadabra - gone.
And fog is so easy to shoot in. Your light meter sees it as neutral gray and most of the time, it reads the exposure correctly.

To make the scene look even softer, I shifted the histogram just a bit to the right in Photoshop so the scene looks a tad lighter. Then I gave it lightened up the edges but kept the sculpture and trees sharp.
Compare this image to the HDR just before. It's the same day, but HDR makes that picture look really cold. Because so much of this photo is soft, it looks warmer.
|
This is one of my favourite photos from my foggy day shoot at VanDusen Botanical Gardens. It's the kinky tree! Don't you just love the knotted branches? This is a scene out of some witch fairy tale. And fog makes it so much spookier. The tree, grass and stone bridge are near the camera, so their colour and texture is clear and focused. Everything beyond the bridge is muted and softened in the fog. |

Layers and Textures
What's the deal with using layers in Photoshop? Why not just work on the original and deal with just one layer?
Here's the deal... whether you work in RAW or you shoot JPGs, you'll always be better off editing your files in layers. The best way to describe a RAW file is that it's like having a negative that needs developing. A JPG, is a file that's already been developed and your camera has compressed it... it's "cooked". Whatever work you do on a JPG is destructive. But, when you work with a RAW file, the original pixel information is always there.
Start out by making a copy of your original file... that preserves the original. Then, for each adjustment, make a separate layer. As you add more layers, you might want to go back to change a previous adjustment layer and experiment with it... or delete it. If you do all your work on your background layer, you can't change anything, it just builds on the previous modification. If you don't like the result, you have to scrap the whole thing and start over. Understand the reasons behind layers now?
|
The stone arch at the north end of the exquisite formal rose garden at VanDusen Botanical Garden. It leads into the heritage rose garden and the "black" garden. I tried editing this photo two different ways. The first version had only minor adjustments... the exact way I saw it. But I prefer the softening and glow to "reality". Maybe because this was shot in bright sunlight (not a good plan) ... it's a high contrast image. Blurring tones down the dark shadows. |

Vancouver is big on Cherry Blossom Festival and this garden makes it's contribution of spectacular cherry trees every spring.

This is an older image from my photography school days... 35 mm slide film, scanned on a Nikon Coolscan. It's an apple tree on an espalier running right alongside the Children's Garden at VanDusen Botanical Garden. At least it was. it's not there anymore. But I love the photo for a few reasons.
- the delicate white apple flowers
- the image is such a great example of perspective
- it follows the Rule of Thirds
- old wooden fences have lots of texture
- the fence creates parallel lines and angles
|
This espalier was in the Children's Garden. It was removed at the time the new VanDusen Botanical Garden Visitor Centre was being built. One board starts at the lower left corner and angles across the image. The top board sits in the upper third (Rule of Thirds). The posts angle across the photo and come closer together on the right side... that creates perspective. Our brains interpret this flat image as a 3 dimensional espalier. |

Cypress Pond is camouflaged with waterlilies and lots of photos there! Use the wooden bridge to get a nice close up shot of a blossom.

You can tell I'm partial to lightened edges and white vignettes for so many of my images. There was a period of time when I applied very dark textures to my images... there are several of those that I still really love, like the two blue waterlilies on this page. But we're all allowed to change and my editing has evolved as well.
iPhoneography...
My iPhone is the camera I have with me all the time so it's the one that I use the most now. Learn about getting the best cell phone photos possible here.
VanDusen Botanical Garden Information
Take a look at the VanDusen Garden's official website.
Accessibility - VanDusen Botanical Garden is wheelchair accessible... but there are a few steep or rocky areas in the 55 acre site. They have some wheelchairs available and you can ask for one at the main entrance.
It's a very popular place for wedding and wedding photos. There are several areas, either on the Great Lawn or near the lakes. The garden setting is spectacular for an outdoor wedding and you absolutely want to have your camera if you're a guest.
Movies - Hollywood discovered Vancouver and VanDusen Botanical Garden years ago and it always seems to be buzzing with film crews. You might be able to catch a glimpse of the stars. But don't expect to take pictures when a movie set has taken over... they get very upset when cameras pop up!

Flower Photography Home › Botanical Gardens › VanDusen Botanical Garden
SUBSCRIBE & STAY IN TOUCH
Recent Articles
-
These Heron Images Make Stunning Fine Art Prints Or Note Cards
Jan 29, 19 06:49 PM
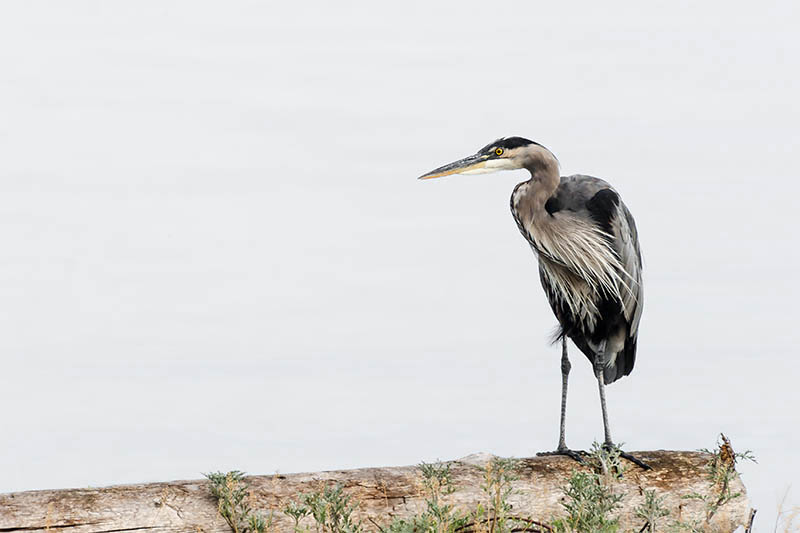 I love my heron images from here on Vancouver Island. One particular pair of herons are always obliging models. They're relaxed and trusting while I photograph and talk to them.
 -
Your Histogram Makes Correct Exposure a Breeze
Jan 22, 19 05:23 PM
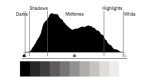 A histogram is easy to read with a bit of practice. An effective tool to help you get the picture you imagine.
 -
Yeomiji Outdoor Gardens, Asia To Europe Without The Jet Lag
Jan 22, 19 04:33 PM
 Yeomiji outdoor gardens delivers a French, Italian and Japanese garden along with several culturally significant Korean gardens.
New! Comments
Please leave me a comment in the box below.I'd love to hear your stories, share your photos and read your comments about this page.