The Iridescent Irises
Myths and Pretty Pictures
Irises come in all colours of the rainbow.... just check out my brilliant beauties in the pictures below. By the way, there is a connection between these flowers and rainbows.

The lovely Ms. Iris was an ancient Greek goddess. She couriered messages between the gods above and men on earth. Think of her as the heavenly internet of old!
Some say she was a young maiden with wings on her shoulders and she rode the rainbows between heaven and earth. Others say she actually was the rainbow!
But, whichever.... when ancient Greeks saw a rainbow in the sky, they knew she was delivering a message from the Gods on Mount Olympus. So, the rainbow and the Iris are one and the same!
|
I. sibirica lives in boggy areas or shade... perfect light for flower photography on a bright day. But I have a serious warning for you... many of these plants can be toxic, especially the roots. They might be poisonous if eaten, depending on the species. Leaves and flowers can cause severe allergic reactions or nasty skin irritations. Don't handle them if you're unsure of the species. |

The Iris Close Up
This was my best picture of an iris when I was in photography school... . it makes gorgeous note cards. The focus is on the front petal. A really soft shade of lavender... not the typical shade. A bright gold tongue... perfect!
35 mm. slide, scanned on Nikon Coolscan. Edited in Photoshop.

I applied very little editing to this photo, after the slide was scanned ... a curves adjustment to even out and darken the blacks in the background and an Unsharp Mask filter in Photoshop. After that, just a frame in On1. It was a beautiful slide that hardly needed any editing.
Okay, now this is the light that shows off that razzle-dazzle colour - it's gorgeous! Want this quality of light? To start, be patient... set up your shot and wait for some light cloud cover. Be ready to get the shot 'cause that perfect light may only last a few seconds.
Another good idea for bright sunny days... use a polarizing filter, but your exposure will change by about 2 stops.
35 mm. slide, scanned on Nikon Coolscan. Edited in Photoshop.

This is such a delicious deep blue-violet. Even though the background greenery is dark and rich, it's okay because it doesn't take anything away from the flower. In fact, I like the deep greens and purples together. They complement each other.
The background is out of focus so there's nothing there that takes your eye away from the bloom. Use a shallow depth of field to blur your background like this. I used a telephone lens at 100 mm and f 4.0.
The white rim around the petals is also a nice touch (thank you Mother Nature) to make each petal stand out. The flower fills the entire scene so there's no wondering what the subject is! Only a curves adjustment, unsharp mask and a frame for this image. If you get it right in camera, there's not a lot required.
Photo Editing - Express Yourself
Your photos reflect who you are. Be what you want to be. Even if you're a realist, you can have fun playing with a photo-editor. I don't process all of my photos in an artistic painterly style. Some I only apply basic adjustments in Camera Raw.
But many of my photographs are impressionistic. 'Painting' my photos lets me play and express my own style in my photos. It makes my pictures unique to me.
I use Lightroom, Photoshop, and Topaz Impression. I've also used ON1.
Don't be afraid of editing programmes. You computer comes with one and if you outgrow that particular programme, move up to a more advanced software. Go through the lessons that come with your photo-editor or search YouTube for help. The point is to enjoy the process while you learn.
This image is actually a coloured photo taken with a Nikon digital camera. It's such a wee flower that came in a mixed flower bouquet. The lens... a Nikon 105 mm macro. The flower is in a vase in front of a white styrofoam panel.

Take your initial photograph in colour... that gives you more flexibility in photo editing. You can work with all the colour channels, contrast, curves and more to fine tune the image before converting it to black and white.
RAW images are always the route to fly if you want to edit your images... and, of course, you always do! With JPG files, the image is already "cooked". You have the ability to perk it up a bit but there's nothing near the editable material in it that a RAW file delivers.
I like this photo as a black and white picture... but it's also pretty in the original colour... so I can have it either way.
Textures
... flaunt your creativity
There's a large garden here at university, between our administration building and Engineering. i spent many hours there from spring to fall. These huge white irises bloom very late spring. There's a "fence" of deep burgundy peonies around them.... such a contrast and simply gorgeous when everything's in full bloom.
In the middle of the garden, appropriately surrounded by an ornate metal fence, is a tiny apple tree. The pride and joy of our horticultural department... grown from a cutting of Newton's apple tree. Yes, the apple that fell on Newton's noggin! That's what the plaque says, anyways.
|
Could be true, but let's get on with textures and layers! I opened this pretty iris image as a Smart Object in Photoshop. That way, all the editing is nondestructive. Anything I don't like is easy to change or delete. After that, a little tweaking and a sepia tone. I scanned through my texture files in Bridge and "placed" the first prospect in Photoshop as a layer. Open it as a Smart Object and it's easy to edit in the Camera Raw plug-in to get just the right look. Play with the transparency and voila! |

Be on the lookout for any kind of texture when you're out with your camera. Wood, rusty doors, water, clouds, brick, rocks, you name it... virtually any surface can be adapted to use as a texture in your images. Then keep a library of them.
This iris has two different texture layers. Add as many as you want for whatever look you're going for. Don't like it? Delete it and try again.
A final touch in On1 with an antique frame. You can craft your own frames in Photoshop as well... lots of fun and easy once you get the hang of it.
|
These purple irises aren't really in front of a wall. They were in a large garden. The two texture layers are part of On1... linen and a red brick wall. The final result looks like the image is printed on canvas. My own work flow from Photoshop to On1 is to Save the PSD file and then Save As a JPG. Do NOT save your original layered file as a JPG or you'll flatten it and lose all your work. As a JPG, everything is cooked into a compressed file that you really can't do much with anymore. Very important not to throw all those layers away. You may want to revisit and revise your image in the future. |

The Irises
... More than just a pretty petal
Irises are such a diverse group and they come in such an array of colours. Frilly or sleek, wild or cultivated garden varieties, they will reward you with some beautiful images. Go out and treat yourself to some at the florist shop. Put them in a vase, place them in the natural light of a window and get your camera out.
These beauties make up about 90 genera of perennials and bulbs with about 300 species and hundreds more cultivars. No lack of photography material here!
- The flowers have 6 petals - 3 standards point up or out - 3 falls point out or down.
- The leaves are shaped like swords or grass. Iris leaves are unique - both sides of the leaf absorb and use sunlight. They leaves stand straight and tall, reaching for the sun through other thick vegetation.
- The cultivar flowers are all colours of the rainbow, often super-frilly - sometimes not - but always super-showy!
- This family is a close relation to the orchid family. Check out all the similarities when you photograph them.

SUBSCRIBE & STAY IN TOUCH
Recent Articles
-
These Heron Images Make Stunning Fine Art Prints Or Note Cards
Jan 29, 19 06:49 PM
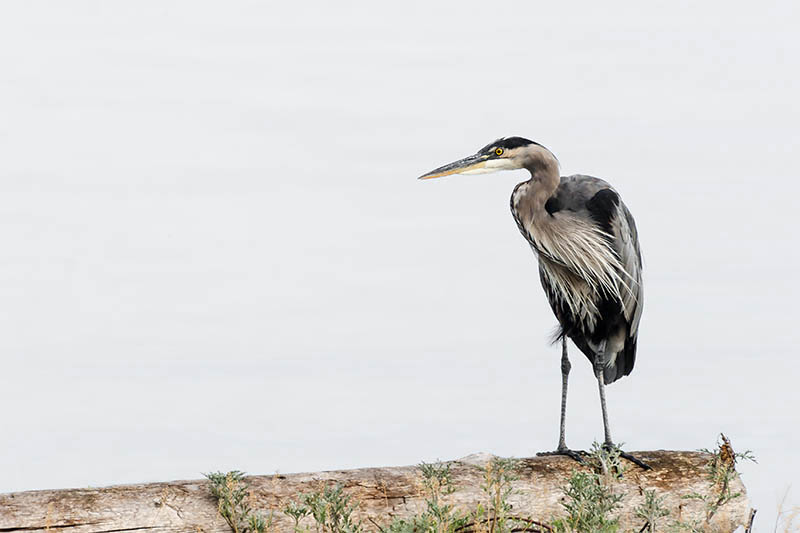 I love my heron images from here on Vancouver Island. One particular pair of herons are always obliging models. They're relaxed and trusting while I photograph and talk to them.
 -
Your Histogram Makes Correct Exposure a Breeze
Jan 22, 19 05:23 PM
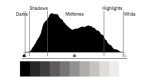 A histogram is easy to read with a bit of practice. An effective tool to help you get the picture you imagine.
 -
Yeomiji Outdoor Gardens, Asia To Europe Without The Jet Lag
Jan 22, 19 04:33 PM
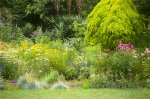 Yeomiji outdoor gardens delivers a French, Italian and Japanese garden along with several culturally significant Korean gardens.
New! Comments
Please leave me a comment in the box below.I'd love to hear your stories, share your photos and read your comments about this page.