Perfect Aperture For a Perfect Picture
The aperture in your camera's lens is one of three fluid elements of the Exposure Triangle. An awful lot like your eyes, it dilates and constricts to control the size of the lens opening.
Brew up some tea, get a pen and paper, and fire up the video. It's simple and quick to make improvements in your pictures...
... and small improvements add up to fabulous photos. Give it a go.
|
Download a PDF script of this video. |
It collaborates with shutter speed and ISO to regulate how much light reaches your sensor.
Multiple combinations can generate the exposure your meter says you need... but coming up with the perfect combination is essential for the look and feel you want for your image.
Don’t shoot what it looks like, shoot what it feels like.
~ David Alan Harvey
So, back away from AUTO and take control of your photography... your aperture is a good place to start.

For more images of Butchart Gardens, Vancouver Island, BC, go here.
In the true sense of the word, it means an opening. .. but in your camera's lens it's also the system of blades that change the size of the opening.
It works in sync with your shutter speed to regulate the amount of light that reaches the sensor (or film).
I compared this system with your eyes a minute ago. The hole in the centre is like the pupil in your eye. The blades are like the iris.
Look at this particular lens. It gives you 8 different sized openings for your exposure.

The jump from the largest aperture f 1.4 to the next size f 2 is called 1 stop. That's a measurement of 1 stop of light.
As an aperture increases by 1 stop, the amount of light doubles. If you decrease by one stop, the amount of light is halved.
- 1 stop larger = double the amount of light (x 2)
- 1 stop smaller = half the amount of light (x 1/2)
It's a bit difficult to understand why an aperture of f 1.4 is gigantic compared to f 16.
- If you know anything about shutter speed, then this will make more sense. If you haven't seen my video and webpage on shutter speed, be sure you do.
Same as shutter speed, it's just understood that you have to make the numbers a fraction. So f 1.4 is really 1/1.4 which is a really big number compared to f 1/16.
Here's an image to help you visualize the concept.
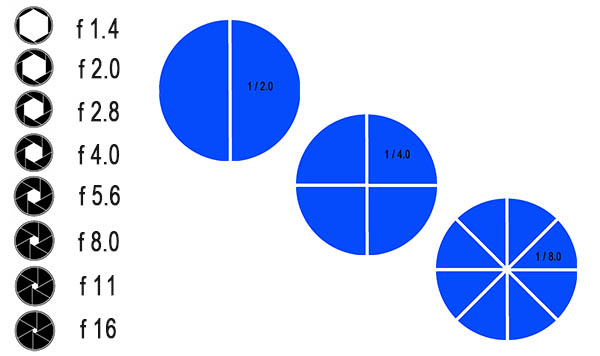
If 2.0 becomes a fraction, it becomes 1/2. So that's 1/2 of a blue pie. .. I agree, blue pies aren't very appetizing!
And 4.0 as a fraction is 1/4 and that's actually smaller than 1/2. If they weren't fractions, 4 would be twice as large as 2, right?
Then, f 8.0 is really half as small as f 4.0 and 4 times as small as f 2.0 - see where we're going with this? Smallsville... all the way small to f 16. Check that itty bitty hole in the middle. Wow, how small do you think f 22 is? Or f 32.... yes, there is an f 32, as minuscule as that is.
So, what you have to remember is:
- For more light, move towards f 1.4
- Your camera may not have such a large aperture... maybe f 5.6 is your widest opening
- For less light, shuffle on through to your 'largest' number, like f 16 or f 22. (And remember, that the largest number is really your tiniest opening.)
- Your camera may have f 16, f 22 and on some lenses, f 32
- Your sharpest aperture is the middle setting for your lens and if you have a few lenses, they may have different ranges. Example, my Nikon macro 105 mm lens's sharpest setting is f 8. My telephoto's sharpest setting is f 11. Choose the sharpest setting when the exposure you want gives you a choice.
For better understanding of these concepts., watch the video at the top of the page.
How To Choose The Correct Aperture
This may help you understand what f stop you need for the picture you want to create...
Suppose there's a fire in your kitchen and if you don't act fast, the kitchen won't be the only thing burning!
- Would you rather have a 1/2 inch rubber tube or a fire hose to put it out? I'm guessing the fire hose!
There are two components here.
- First, the amount of water coming through a large opening or a small opening.
- Second is the time it takes to put the fire out with a fire hose, as compared to the time it would take with a small tube!
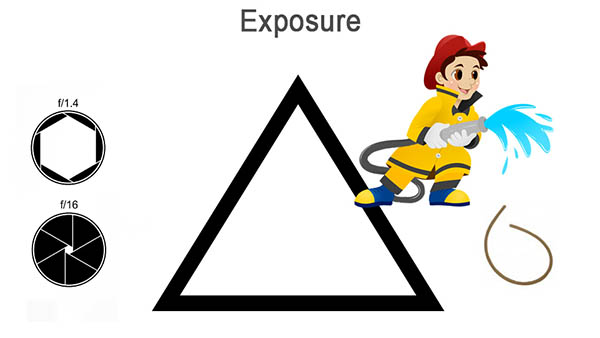
Switch from water to light coming through your camera lens.
- large opening = more light
- small opening = less light
The smaller window needs the shutter to stay open longer for the same amount of light to get to the sensor.
If your plan is that your subject will be in focus and your background blurred, use a large aperture, maybe f 2 or f 4 which has a shallow depth of field.
For shooting a grand landscape, like mountains and a stream, use f 8, f 11, maybe f 22 which has a very deep area of focus.
- How much you get in focus in your photo is dependent on many things and I advise you to watch the video to find out more about your depth of field (DOF).
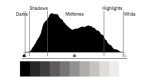
Your Camera's Light Meter
Your camera meter tells you when your exposure is correct for the scene you're photographing. You make adjustments to keep the needle at 0.
- +1 means you are 1 stop overexposed... too much light
- - 1 means you are 1 stop underexposed... not enough light
You can juggle ISO, shutter speed and aperture to come up with the exact exposure you want.

There are situations where your meter lies! Such as when you're shooting a very light, bright scene like a new snowfall. Or, the opposite, when you're scene is mostly dark.
... your light meter wants to record everything at middle gray so you need to know when to make adjustments, and what kind of adjustments.
 |
A portrait of a peony plant in a ceramic pot. I’m close to the plant and my DOF is smaller than if I stood 12 feet away... so I can’t use f 2.0 |
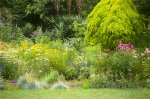
 |
The same peony plant. My camera was on a tripod. If your intention is to have everything sharp, then this does the job. My personal preference is have a blurred background and only the plant in focus. |
Will you help me adjust my exposure settings?
I'm about to take a photo of some red roses on a rose bush.
I had everything figured out :
- ISO 200
- f 16
- shutter speed 1/30
But, darn it... I don't have my tripod with me and I can't hold my camera steady at 1/30th, plus... there's a breeze and the roses are blowing around a little!
I want to freeze all motion in the leaves and petals. What would you do?
I need 1/250th of a second for my shutter speed. That's 3 stops away from the exposure I have now and I need to figure out how to get 3 stops of light back. Your thoughts?
I don't have much leeway in my f-stops because I'm close to the roses and my DOF decreases the closer my camera is to the subject.
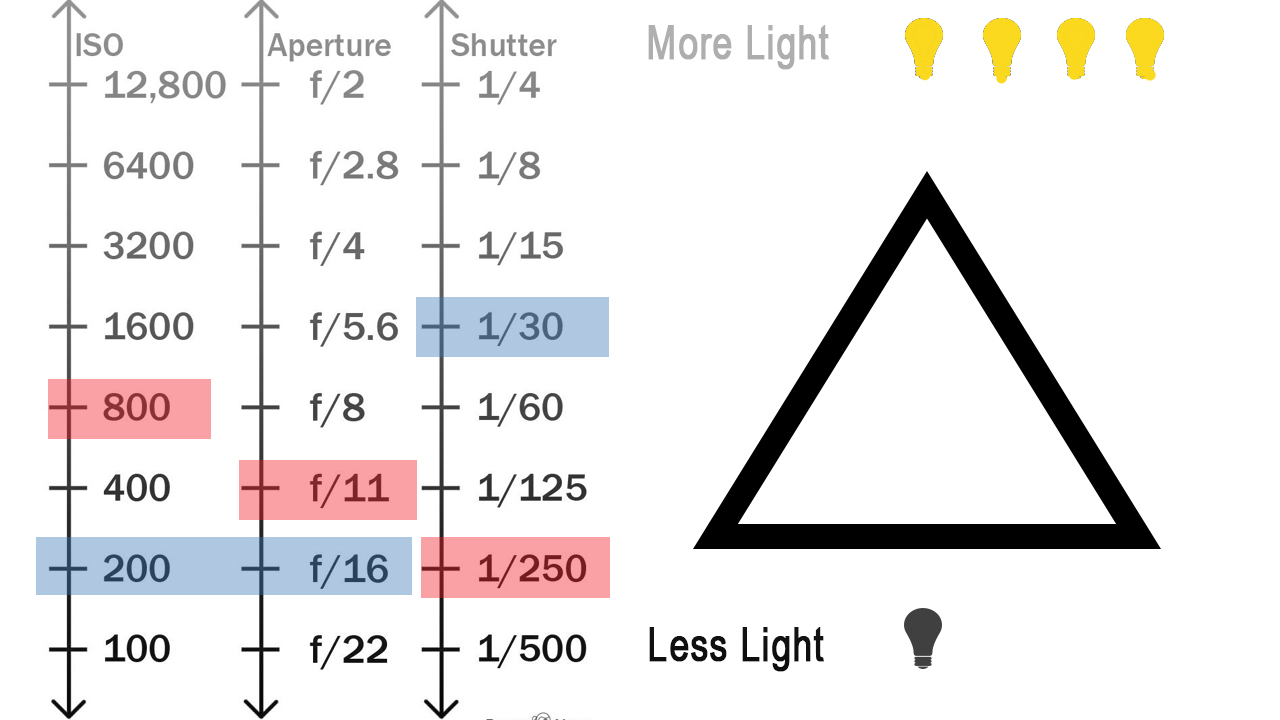
I like this "cheat sheet" to explain ISO, shutter speed, aperture and the interactions between them. This is one of many out there on the internet.
Maybe f11 - 1 stop - would be alright but no more than 1 or I'll lose my DOF.
ISO is the only other change to make. I know my camera doesn't produce much noise on ISO 800 so there's my best bet. That gives me 2 stops more light.
There's my 3 stops and I can still keep a reasonable depth of field.
I think that's easy enough to follow on this chart. The 'red' numbers are what I started with and the 'blue' numbers are the changes to get the 3 stops of light I lost when I increased my shutter speed to 1/250th.
Just to let you know.... it's not always this easy. There are times you won't be able to get the f-stop or the shutter speed you want. You will have to compromise sometimes.
But things will be more forgiving if you have a tripod and you don't have to rely on hand holding your camera. With a tripod you're more flexible with your shutter speed.
For a greater understanding of these concepts., watch the video at the top of the page.
When You Change Your Lens...
Since your selection of apertures depends on your lens....
Changing your lens means you may change your range of apertures.... and your 'sweet spot' (your sharpest aperture).
Check the camera manual and if you haven't bought that brand new lens yet, do your homework first. Read the specs online, talk to the experts at the camera shop and buy a lens that fits the kind of photography you love to do.
Lenses are not cheap... don't buy one and then find out it's not what you want. Rent it for a week or two first. Many camera shops encourage you to rent first.

Hyperfocal Distance
... to get your entire scene sharp
When you shoot landscapes, use what’s called hyperfocal distance. That basically means - “What’s the closest point to me that I should focus on to make sure my foreground, middle ground and background are all in the sharpest focus possible?
You can get as technical as you want with this. Go online and search for a good article. There's lots I don't care to dive deeply into and this is one subject! Instead....
Here's a quick and effective cheat -
… focus about a third of the way into your landscape and that should about do it. ... at least for landscapes. This will get your entire scene in focus from foreground to background.
Please leave a comment below on what you've learned or any topic you want to know about. And if you enjoyed this page, it would be super if you'd "like" it.
All this helps me know how to create even more great content for you.

Flower Photography Home › Exposure › Aperture
SUBSCRIBE & STAY IN TOUCH
Recent Articles
-
These Heron Images Make Stunning Fine Art Prints Or Note Cards
Jan 29, 19 06:49 PM
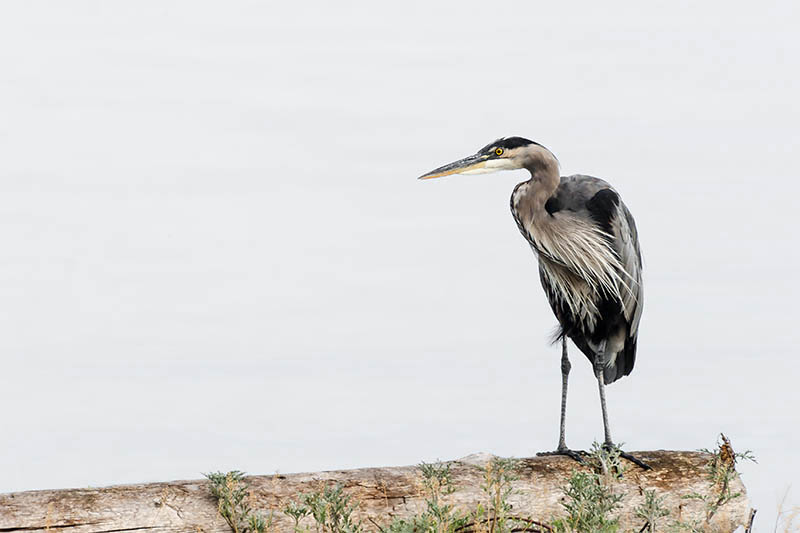 I love my heron images from here on Vancouver Island. One particular pair of herons are always obliging models. They're relaxed and trusting while I photograph and talk to them.
 -
Your Histogram Makes Correct Exposure a Breeze
Jan 22, 19 05:23 PM
 A histogram is easy to read with a bit of practice. An effective tool to help you get the picture you imagine.
 -
Yeomiji Outdoor Gardens, Asia To Europe Without The Jet Lag
Jan 22, 19 04:33 PM
 Yeomiji outdoor gardens delivers a French, Italian and Japanese garden along with several culturally significant Korean gardens.
New! Comments
Please leave me a comment in the box below.I'd love to hear your stories, share your photos and read your comments about this page.