How to Make Convertible Mittens
... Keeping Photographers Hands Warm
Convertible mittens are the answer to protecting your hands from cold cameras and tripods in chilly weather.... but needing hands-free to make adjustments on your camera. These are my favourite mittens and I made several pairs.
What you need to knit my favorite photography accessory -- convertible mittens...
One set of four 3 1/4 mm (US 3) double pointed needles or size to obtain the correct tension. One 4 mm double pointed needle (optional).
Make sure you test the tension first before you knit these convertible mittens or you might be sorry!
Step by Step to Convertible Mittens
Yarn and tension...
Your needle size will vary according to the thickness of the yarn you use.
Check the label on your yarn (BEFORE you buy it!). It should note the tension for a 4 inch swatch (10 cm) = 23 stitches and 30 rows using 3 1/4 mm needles in stocking stitch. Change the size according to your swatch results.
I use my own handspun yarns for all my knitted garments but many store purchased yarns will knit up fine for your convertible mittens.

Instructions...
These instructions are for the smaller size (average woman's hand). For the larger size convertible mittens, use the instructions in ( ).
Right hand...
*** With your smaller needles cast on 48 stitches (sts). Divide 16 stitches equally between 3 needles. Knit them in a round and make sure you don't twist the stitches. Work 9 cm (3 1/2 in) in K2 P2 ribbing. Knit 2 (6) rounds.
To make thumb gusset: 1st round: P1 (Inc 1 st in nect st) twice, P1. Knit to the end of round.
Next 4 rounds: Knit all knit sts and purl all purl sts as they appear.
Next round: P 1. Increase 1 st in next st. Knit to 2 sts before the next purl st. Inc 1 st in next st K1. P1. Knit to the end of round.
** Next 2 rounds: Knit all knit sts and purl all purl sts as they appear.
Next round: P1. Inc 1 st in next st. Knit to 2 sts before the next purl st. Inc 1 st in next st. K1, P1. Knit to end of round **.
Repeat from ** to ** until there are 14 sts between the 2 purled sts. 60 sts.
Next 2 rounds: Knit all knit sts and purl all purl sts as they appear.
Next round: Turn. Cast on 4 sts.
Turn: Slip next 16 sts onto a thread and leave for thumb. Knit to end of round. 48 sts. ***
Next round: (Marking round). K24. Place marker. If desired, change to 4 mm needle and knit to end of round. Place marker.
(It might be helpful to pull a piece of contrasting yarn through the stitches between the markers knit on larger needle. Knitting these stitches on a larger needle makes it easier to pick up stitches from them when working the flap of your convertible mittens.)
Change to smaller needles. Knit 10 (12) rounds.
Making the 4 fingers...
To make 1st finger: Knit first 5 sts. Slip all but the last 9 sts onto a thread.
Turn: Cast on 2 sts.
Turn: Knit the last 9 sts. Divide these 16 sts onto 3 needles. Join in round. Knit to end of round. Work 8 rounds in (K2 P2) ribbing. Cast off in ribbing.
To make 2nd finger: Slip next 6 sts from thread.
Turn: Cast on 2 sts.
Turn: Knit last 6 sts. Pick up and knit 2 sts at base of first finger. Divide these 16 sts onto 3 needles. Join in round. Knit to end of round. Work 8 rounds in (K2 P2) ribbing. Cast off in ribbing.
To make 3rd finger: Slip next 6 sts from thread.
Turn: Cast on 2 sts.
Turn: Knit last 6 sts. Pick up and knit 2 sts at base of second finger. Divide these 16 sts onto 3 needles. Join in round. Knit to end of round. Work 8 rounds in (K2 P2) ribbing. Cast off in ribbing.
To make 4th finger: Slip the last 10 sts from thread. Pick up and knit 2 sts at base of third finger. Divide these 12 sts onto 3 needles. Join in round. Knit to end of round. Work 8 rounds in (K2 P2) ribbing. Cast of ribbing.
To make thumb: Knit the 16 sts which were left for the thumb. Pick up and knit 4 sts at base of thumb. Divide these 20 sts onto 3 needles. Knit 17 (19) rounds even.
Next round: (K3, K2 tog) 4 times.
Next round: (K2 K2 tog) 4 times.
Next round: (K1 K2 tog) 4 times.
Break the yarn. Thread the end through the 8 sts. Draw up and fasten securely. You've finished the hardest part of your convertible mittens.

Making the flap:
Begin at the marker, pick up 24 sts across loosely knit sts of marked reound. Cast on 24 sts. Divide these 48 sts onto 3 needles. Join in round.
Knit 10 rounds: K24 (P2 K2) 6 times.
Next round: Knit
Knit 15 rounds even.
Then...
1st round: Sl1, K1, psso, K20, K2 tog, Sl1, K1, psso, K20, K2 tog.
2nd and alternate rounds: Knit.
3rd round: Sl1, K1 psso, K18, K2 tog, Sl1, K1, psso, K18, K2 tog.
5th round: Sl1, K1, psso, K16, K2 tog, Sl1, K1, psso, K16, K2 tog.
Continue to decrease in this way until there are 16 sts in the round.
Next round: Knit, Cast off.
Sew the top seam of your knit mittens. If you think the flap will get in your way, sew a fastener or velcro onto the glove and the flap. Then the flap will be secured when you need your fingers free for your camera...
I haven't had any problems so I didn't add them.
Now to make the left hand of your convertible mittens...
Work from *** to *** as you did for the Right Hand.
Next round: (Marking round). Place your marker. Change to the larger needle and K 24. Place your maker. (It might be helpful to draw a length of contrasting yarn through the stitches between markers that you knit on the looser needle.) Change back to the smaller needles and knit to the end of the round.
Knit 10 (12) rounds.
To make the 1st finger: Knit first 9 sts. Slip all but last 5 sts onto a thread. Cast on 2 sts. Knit last 5 sts. Divide these 16 sts onto 3 needles. Join in round. Work 8 rounds in (K2 P2) ribbing. Cast off in Ribbing.
Work the remainder of the Left Hand the same as instructions for the Right Hand of your knit mittens.
These Convertible Mitts are the best invention ever! They keep my fingers toasty warm on frosty fall garden photography visits.
And here they are keeping my model's hands cozy...
 |
 |
Now all you need to do is to put your cozy photography accessory to good use...
convertible mittens - knit with love!

Flower Photography Home › Photography Equipment › Convertible Mittens
SUBSCRIBE & STAY IN TOUCH
Recent Articles
-
These Heron Images Make Stunning Fine Art Prints Or Note Cards
Jan 29, 19 06:49 PM
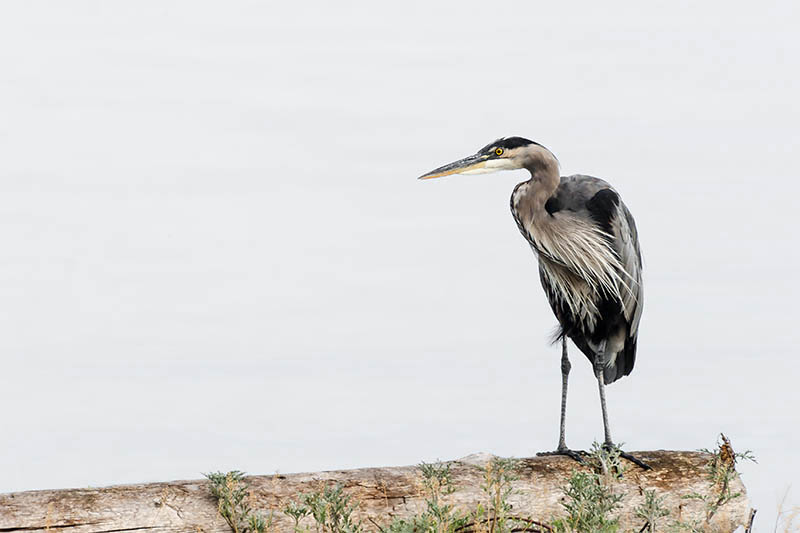 I love my heron images from here on Vancouver Island. One particular pair of herons are always obliging models. They're relaxed and trusting while I photograph and talk to them.
 -
Your Histogram Makes Correct Exposure a Breeze
Jan 22, 19 05:23 PM
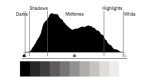 A histogram is easy to read with a bit of practice. An effective tool to help you get the picture you imagine.
 -
Yeomiji Outdoor Gardens, Asia To Europe Without The Jet Lag
Jan 22, 19 04:33 PM
 Yeomiji outdoor gardens delivers a French, Italian and Japanese garden along with several culturally significant Korean gardens.
New! Comments
Please leave me a comment in the box below.I'd love to hear your stories, share your photos and read your comments about this page.